Category Archives: Proxy Tutorials

How to Unblock Instagram at School or Work

Social media allows us to accomplish diverse tasks: from video chats with friends to spreading the word about your company’s services.

Use of apps like Instagram may be productive and relevant to what you’re doing at school or work, however many people scroll through content to slack off.

So, many institutions have opted to ban social media apps entirely, and network administrators are able to follow through on this by blocking access to URLs like https://www.instagram.com/.

Situations can arise where you need to check Instagram to do your work, but the network won’t allow it. And this is when bending the rules on occasion may be reasonable.

Can Insta be Productive?

Content on Instagram varies a lot and it has evolved considerably from a place to take in beautiful photos or post photos of your road trip. In fact, education, business and self-improvement are very popular topics on the platform.

Instagram can be enriching or a waste of time depending on your habits. It’s important to be mindful of the accounts you follow. While a lot of the photos on Instagram will merely be a distraction at school or work, some of it provides succinct knowledge that could actually save you time.

If used correctly, it can increase your productivity. However, few people have the discipline to pull this off.

The app has a great feature that allows you to limit the time on spend on it daily. To use it, go to “Settings”, then tap on “Account.” Next, tap “Your Activity” and you’ll see reminder and notification settings.

Unblock Instagram

Use Phone Data

If you launch Instagram and can’t view your feed, try turning off Wi-Fi and enabling wireless data.

There’s a good chance this will work because Wi-Fi uses the network which has internet access rules applied by the admin, while mobile data works independently of the local network.

Get a VPN

If you don’t have mobile data or don’t want to use up your monthly bandwidth, you can also use a Virtual Private Network (VPN) to access Instagram.

A VPN service allows you to choose a new IP that is associated with the location of your choice. This provided IP allows you to bypass restrictions set by the network admin while still connecting to the network via Wi-Fi.

It’s the best solution for people that want to hide their identity, location, or unblock apps and websites. You need to be subscribed to VPN service, many of which are fast and affordable.

To get started, learn more about the best VPNs that are recommended here most.

Use Your PC with Tor

If you simply want to browse Instagram and don’t need to post, using your PC is an alternative that is often overlooked.

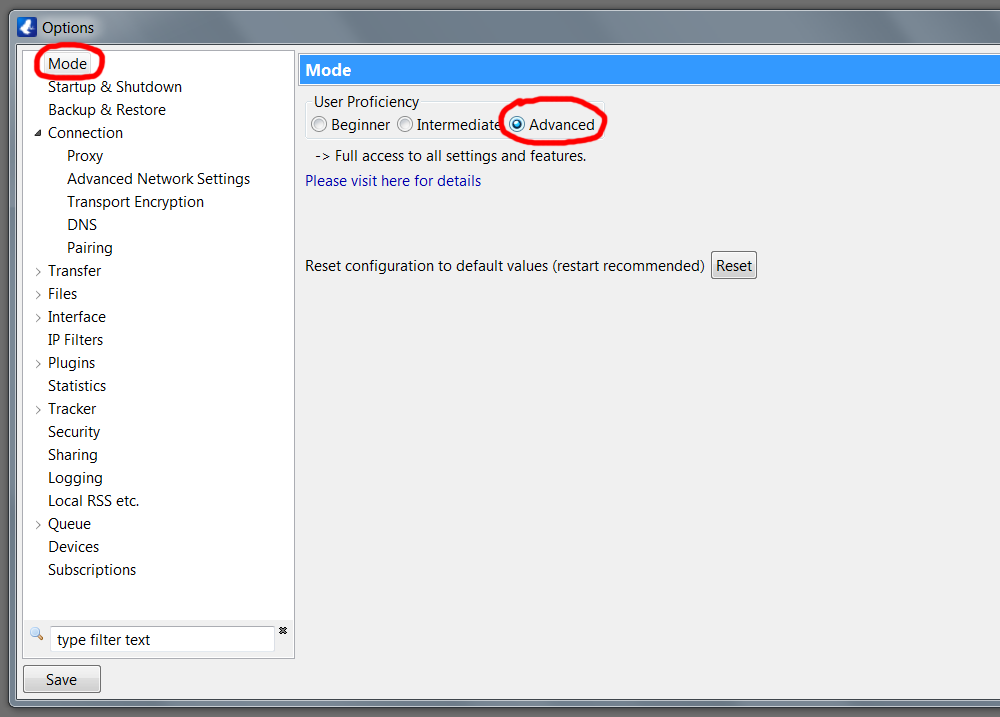
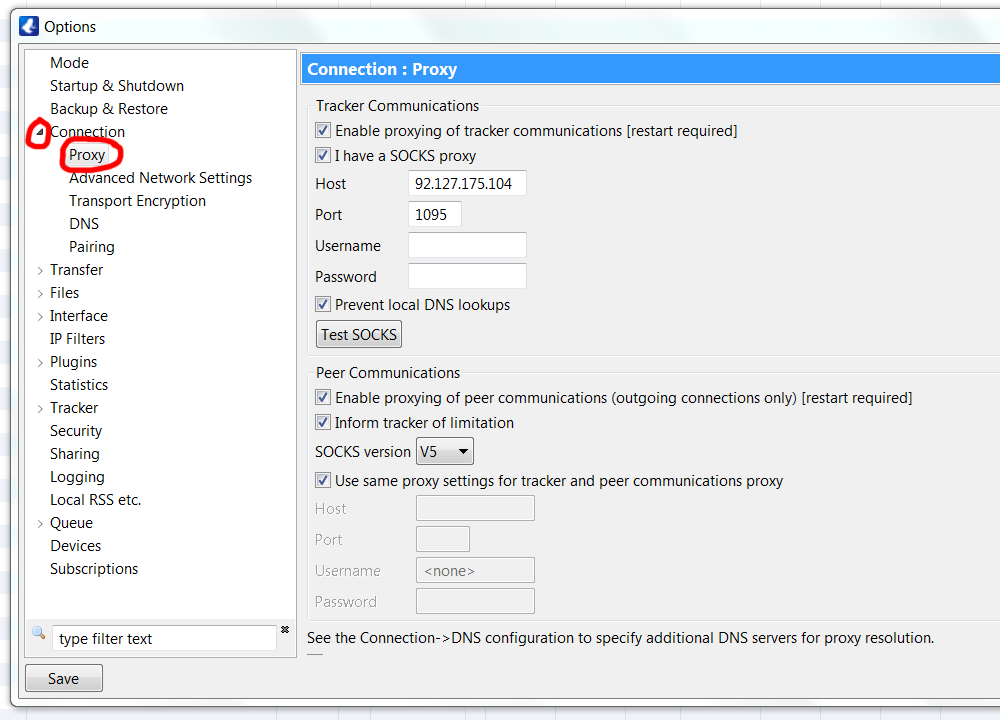
If the URL https://www.instagram.com/ is blocked on all devices, you may be able to download and install Tor. This is proxy software that allows you to use the IP of another user connected to the Tor network.

Once the software changes your IP, Instagram will be unblocked. It’s free but be warned that it’s not as safe or nearly as fast as a VPN.

Typically, Tor should be a last resort, only to be used temporarily then uninstalled. This approach will only work at small businesses that don’t restrict which software can be installed.

Wrapping It Up

Use these tips responsibly and enjoy your new-found access to Instagram!

As the app can be useful at both school and work, blocking access might not be the best policy. However, it’s best to be as respectful of the restrictions even if you’re forced to bypass them at times.

How to Hide Your IP Address in Vuze

The BitTorrent application once known as Azureus continues to be a popular choice as many are attracted by its slick interface and wealth of features.

Follow the directions below to hide your real IP from other BitTorrent users as well as companies that use advanced tracking software to spy on users who download certain torrents.

Step 1

From the top menu go to Tools > Options

Step 2

Make sure “Mode” is selected at the left pane inside the Options window.

Under “User Proficiency” click on the radio button marked “Advanced.” This will give you access to proxy options not available when the lower levels of user proficiency are enabled.

vuze-proxy1

Step 3

Click on the small arrow next to “Connection” in the left pane. This item will expand to reveal subsections. Click on “Proxy” (listed under “Connection”).

vuze-proxy2

In the main part of the window under the label “Tracker Communications” click on the checkbox next to “Enable proxying of tracker communications (restart required).”

Further below under “Peer Communications” click on the checkbox next to “Enable proxying of peer communications (outgoing connections only) (restart required).”

Don’t restart yet; do that later after you’ve entered the required values in the Proxy window.

Step 4

To continue with this step you’ll need to determine which proxy host you’d like to use.

For testing purposes I used a SOCKS v5 host I found on socks-proxy.net, and while this is adequate for very small files the speeds are much slower than paid services.

If you plan on hiding your IP in Vuze on a regular basis and are interested in larger files like most people (movies, music, software), you’ll need to sign up with a VPN service.

Recommended services:

Enter the information provided by a site that lists proxy host IPs (and ports). As a sample to give you a good idea of what you need to enter, I’ve entered the required fields using a publicly available host from Russia in the screenshot.

vuze-proxy2

Most users will want to want to “use the same proxy settings for tracker and peer communications proxy”, so make sure this is checked under “Peer Communications.”

After you’d entered the required info remember to click on the “Save” button in the lower left of the window.

Step 5

Now you can safely restart the software.

Go to File > Restart Vuze (just above Exit).

All Done

That’s it! You’re now ready to start downloading. Load in a torrent and see what kind of speeds you’re able to get.

How to Hide Your IP Address in uTorrent

Peer-to-peer file sharing users are becoming increasingly concerned about exposing their IP publicly. As you’re aware, uTorrent shows connected IPs under the “Peers” tab.

utorrent-1

More concerning is the ability of film studios for example to plant tracking technology embedded right into the video. This allows them to issue copyright infringement notices through ISPs. I’m not encouraging piracy, merely noting that your IP can be harvested and possibly used against you when you share or download torrents.

The idea behind this tutorial is to replace your real IP with the IP associated with a VPN service.

Step 1

For testing purposes I used JustFreeVPN. Please note that free VPNs are excruciatingly slow especially when downloading huge files via torrent.

I strongly recommend that you sign up with one of the reputable, fast VPN providers below to avoid frustration. Plans are typically $10/month or less.

Recommended services:

Step 2

From the top menu go to Options > Preferences (Windows) or uTorrent > Preferences (Mac).

Step 3

A new window will pop up. Click on “Connection” on the left (Windows) or on the “Network” icon (Mac).

Step 4

Select the proxy server type from the dropdown button as specified by your VPN provider. Check the box next to “Authentication” and enter the username and password you were given.

Windows

There are a number of advanced options here under “Proxy Server” and “Proxy Privacy.” For maximum protection check all the boxes as shown in the screenshot.

Click the “Apply” button.

utorrent-2

Mac OS X

Check the boxes under your login info as shown in the screenshot for maximum protection.

utorrent-mac-1

All Done

Congrats! Your real IP will no longer be displayed in uTorrrent.

How to Hide Your IP Address in Windows 7 and Vista

Surfers seek to hide their IP for a number of reasons. Often it is done to view sites that have been blocked by an administrator at school or work. No matter the reason, it’s easy to accomplish once you know the basic steps to follow.

It would be impossible to browse online without any IP address at all, because that is how web pages can route your requests. Hiding your IP address is actually a process of changing your ISP-issued IP to a new one, in effect “hiding” your old IP.

Although there is a wide variety of ways to hide your IP in different applications such as web browsers, here we’ll be looking at changing the system settings in Windows 7 or Vista to achieve the desired effect.

Note: It’s not recommended to use this method often, as your ISP may have a policy preventing frequent renewal of IPs. If you need to change your IP often, use a proxy server instead by following one of the tutorials below.

Step 1: If you have a router

Turn your router AND modem OFF.

Disconnect the Ethernet cables from your router.

Plug the cable from your modem directly into your computer.

Restart both the computer and modem.

Wait for your Internet connection to become active again.

Launch a web browser to confirm that your internet connection is working.

If you run into any difficulties, restart your modem and computer again. First, disable your Local Area Connection (LAN). Then, enable the LAN connection. Most likely that will bring your connection back.

Step 2: Confirm your current IP address

Visit CheckIP.org to see your current IP address (for comparison purposes later). Paste the IP into Notepad or write it down.

Step 3: Launch Command Prompt

Click the START menu, then type “cmd” in the white search box (don’t include the quotes) and hit Enter.

Step 4: Release the current IP

When the window pops up and prompt appears, type “ipconfig /release” (with a space before the slash) and hit Enter.

Step 5: Reset your modem

Turn your modem OFF and wait 30-45 seconds before switching it back ON.

Wait another 30-45 seconds after restarting the modem. Watch as the LED lights light up.

Step 6: Reset your connection

Go back to your START Menu then click on “Control Panel.”

Click “Network and Internet”, then “Network and Sharing Center” (click the big green text, not the blue links)

In the left-side pane, click the link for “Manage network connections”

Select your “Local Area Connection”, Right-click it, and choose “Disable”.

Wait 10-15 seconds.

Once more, right-click on “Local Area Connection,” and this time select “Enable”.

Wait 30-60 seconds. This is an IMPORTANT step. Do not try to proceed before giving it some time to work.

Step 7: Confirm the changes

Go to CheckIP.org to see your current IP address. Compare the original IP you either pasted into Notepad or wrote down to the IP in your web browser.

Nice work! You have successfully hidden your IP address in Windows 7 or Vista!

It’s recommended that you run CCleaner to clear the cookies from your computer. Otherwise your efforts to shake off trackers will most likely be wasted.

How to Hide Your IP Address in Mac OS X (Mavericks, Mountain Lion, Snow Leopard etc.)

By hiding your IP address you can free yourself from limited access of the internet, view foreign content or simply surf anonymously. Regardless of the reason, configuring a new IP in Mac OS X is a straight-forward process.

Keep in mind that there isn’t any way to literally hide your IP. Without an IP your computer would be unable to view any web pages at all because this is how requests to view content are routed. What you are actually doing is changing your “real IP” to a decoy address.

There is a huge variety of methods you can use to hide your IP with third-party applications. This tutorial will teach you about the most popular methods: hiding your IP address in Safari and Firefox.

Step 1: Confirm your current IP address

Visit CheckIP.org to view your current IP address (for comparison purposes later). Paste the IP into TextEdit or write it down.

Step 2: Get proxy server IP addresses

In order to continue with the tutorial you will need a list of valid proxy servers to pull data from. Be warned that free proxies are unstable, slow are unsuitable for viewing secure SSL pages. Still, the links below will get you started with some of the better free proxy lists. You can always get your own private proxy servers or VPN for the best performance if you’re unsatisfied with free proxies.

Step 3: Hide your IP address in Safari

Go to the “Advanced” tab, and next to “Proxies”, select “Change Settings…”

Next click on “Configure Proxies”, then choose “Manually”.

Tick the boxes for “Web Proxy (HTTP)” and “Secure Web Proxy (HTTPS)”

In the text area “Bypass proxy settings for these Hosts and Domains”, enter “localhost, 127.0.0.1”

In the box “Web Proxy Server”, enter settings from Step 2.

Click “OK” to make the changes.

Step 4: Hide your IP address in Firefox

On the first dropdown menu of Firefox, select Preferences

Go to the “Advanced” tab, then click the “Network” tab.

In the section “Configure how Firefox connects to the internet”, choose “Settings”.

Check “Manual proxy configuration” and “Use this proxy server for all protocols”

In the white text area that says “No Proxy for”, type “localhost, 127.0.0.1” (prevents relaying of internal connections).

For the HTTP Proxy and Port entries, see Step 2.

Click “Apply Now.”

Nice work! You have successfully hidden your IP address in Mac OS X!

It’s recommended that you clear the cookies from Safari and/or Firefox. Otherwise your efforts to shake off trackers will most likely be wasted.