Category Archives: Proxy Tutorials

How to Hide Your IP Address on Android

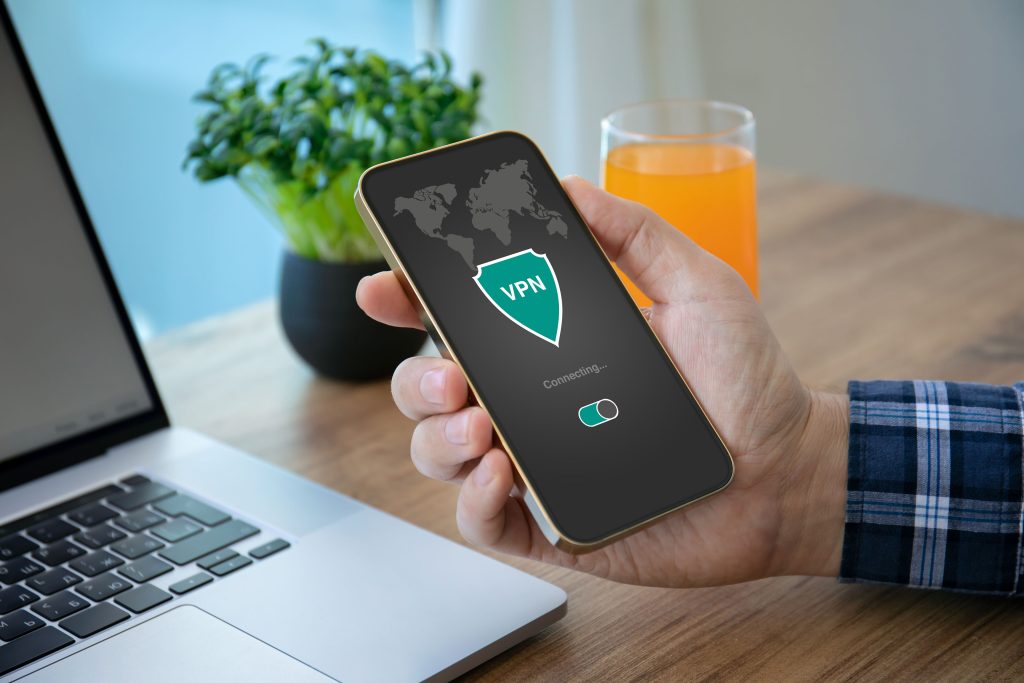
As VPNs have become widely used and smartphone processing power has exploded, Google has equipped Android with powerful VPN features.

Although there are apps that can hide your IP on Android, you can do the same thing right within the OS. Android has a built-in VPN client that supports many of the most popular VPN protocols.

This tutorial teaches you how to utilize a VPN service to mask your IP with no additional software.

Note that this guide was created using a Samsung smartphone. Your version of Android may look a bit different.
Step 1

Using a VPN has become the standard solution for anonymous browsing, making it next to impossible to trace activity back to your true IP address.

Before you get started with exploring the connection settings in Android, you need to have a VPN.

One of the first things to check is the VPN protocols supported by your version of Android. There’s a good chance it’ll be IKEv2/IPsec MSCHAPv2, IKEv2/IPsec PSK, and IKEv2/IPsec RSA. VPN technology is evolving quickly. Google moves to the fastest and most secure new protocols and leaves the rest behind.

Next, be sure that the VPN service you plan to use supports the same protocols as your version of Android.

I used a free VPN for testing purposes. And while free services can get the job done for light use, paid options are the fastest and offer superior security.

If you’re looking for a VPN, LetMeBy has reviewed the top 3 VPN services. Alternatively, if you’re in a hurry, here are the VPNs most commonly recommended on this blog:
Step 2

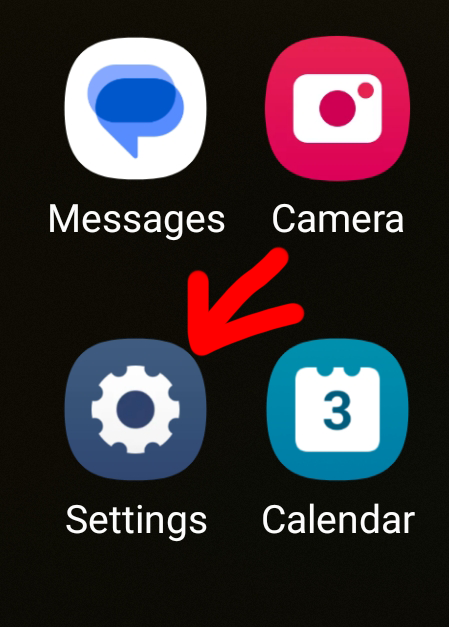
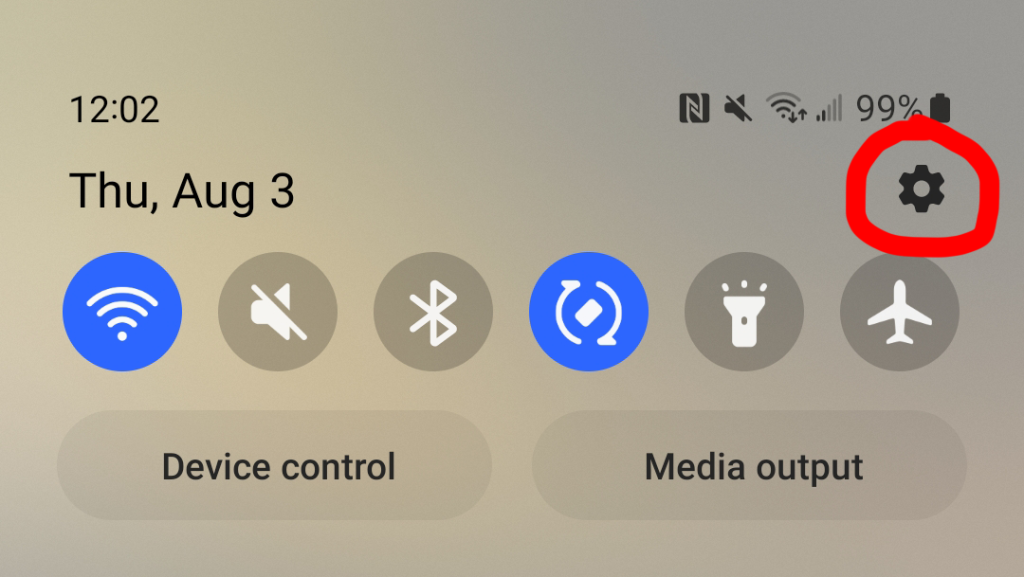
Locate “Settings” either by browsing your apps or by swiping down at the top of the screen to reveal the quick settings menu.

To access your settings from the quick settings menu, tap the cog icon at the top right of the screen.
Step 3

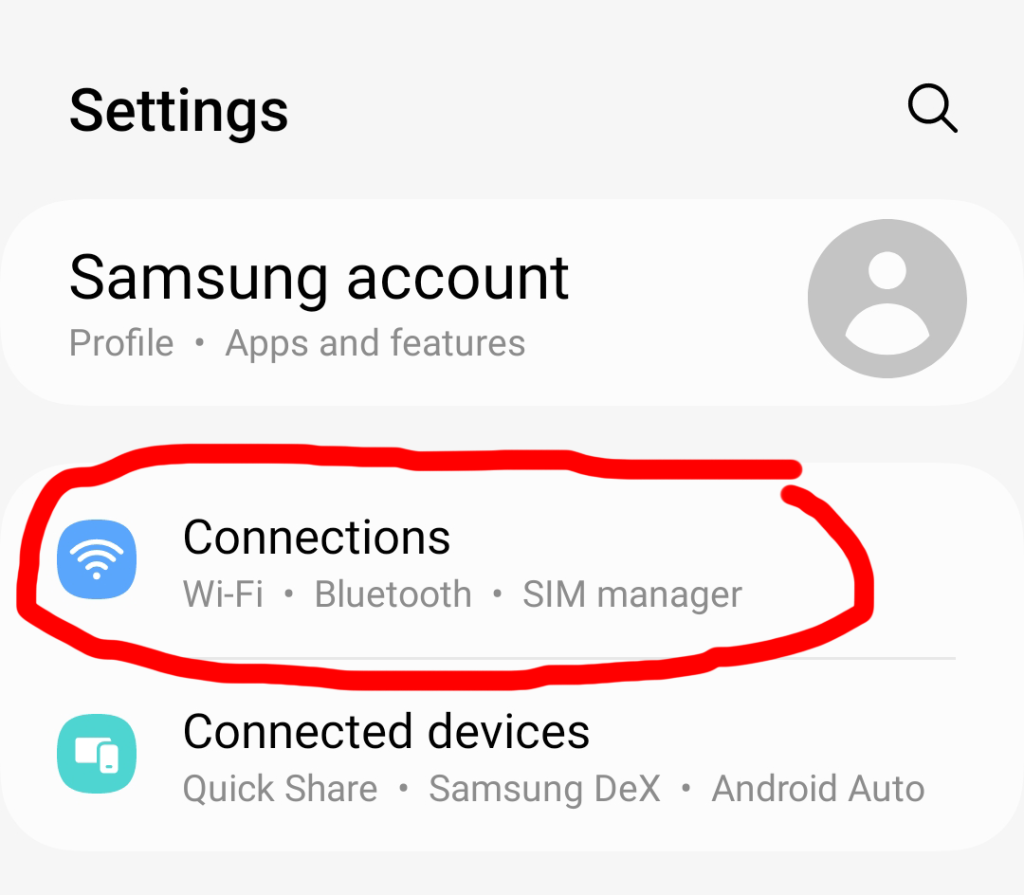
Now that the “Settings” menu has appeared, scroll down to “Connections” and tap it.

The options here control how you connect to the internet, connect to your mobile provider, Bluetooth devices, etc.
Step 4

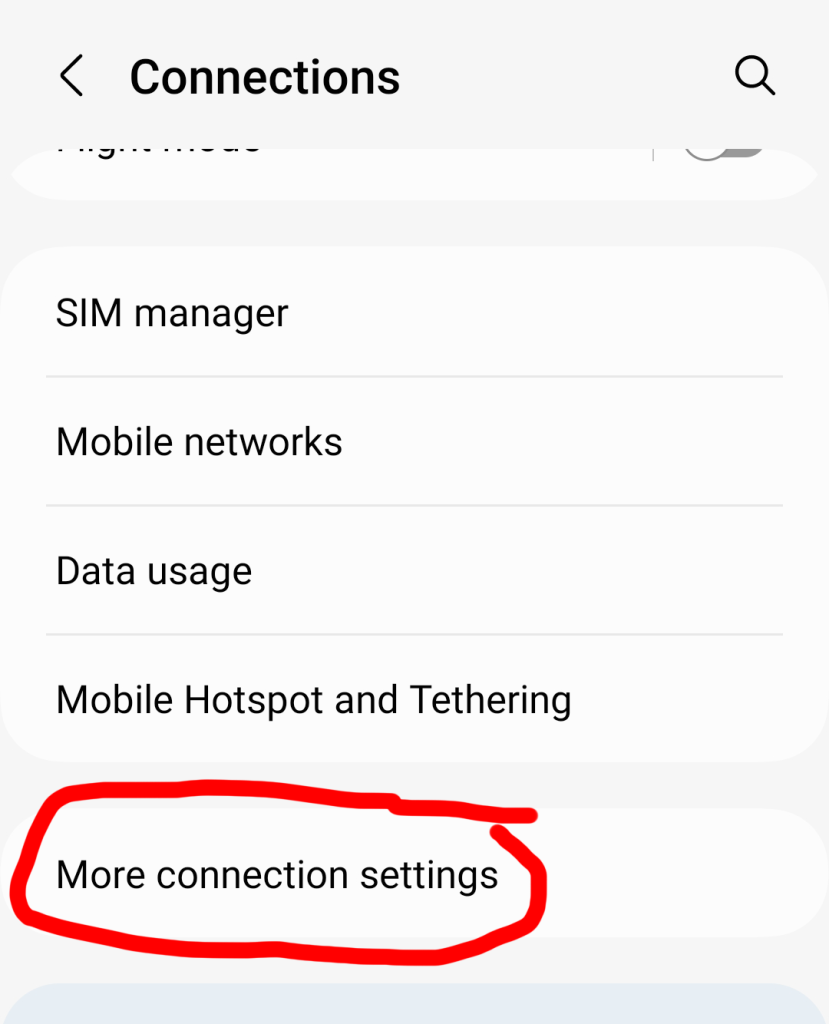
Scroll down to “More connections settings” near the bottom. Tap it.
Step 5

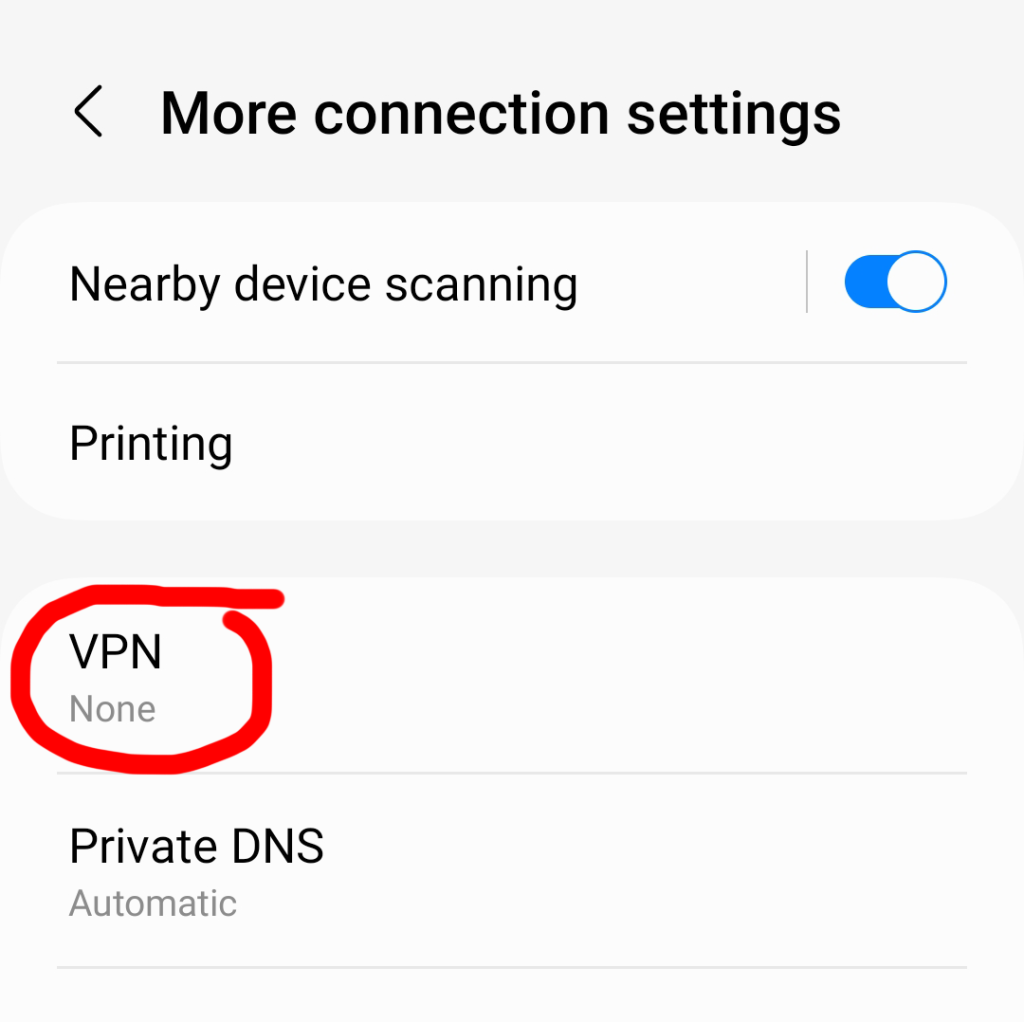
In the “More connections settings” screen, go to “VPN.”

Step 6

If you’ve never set up a VPN before this screen will be mostly blank with text that says “No VPNs.”

Tap the icon at the top right that looks like three dots stacked on top of each other. Choose “Add VPN profile.”
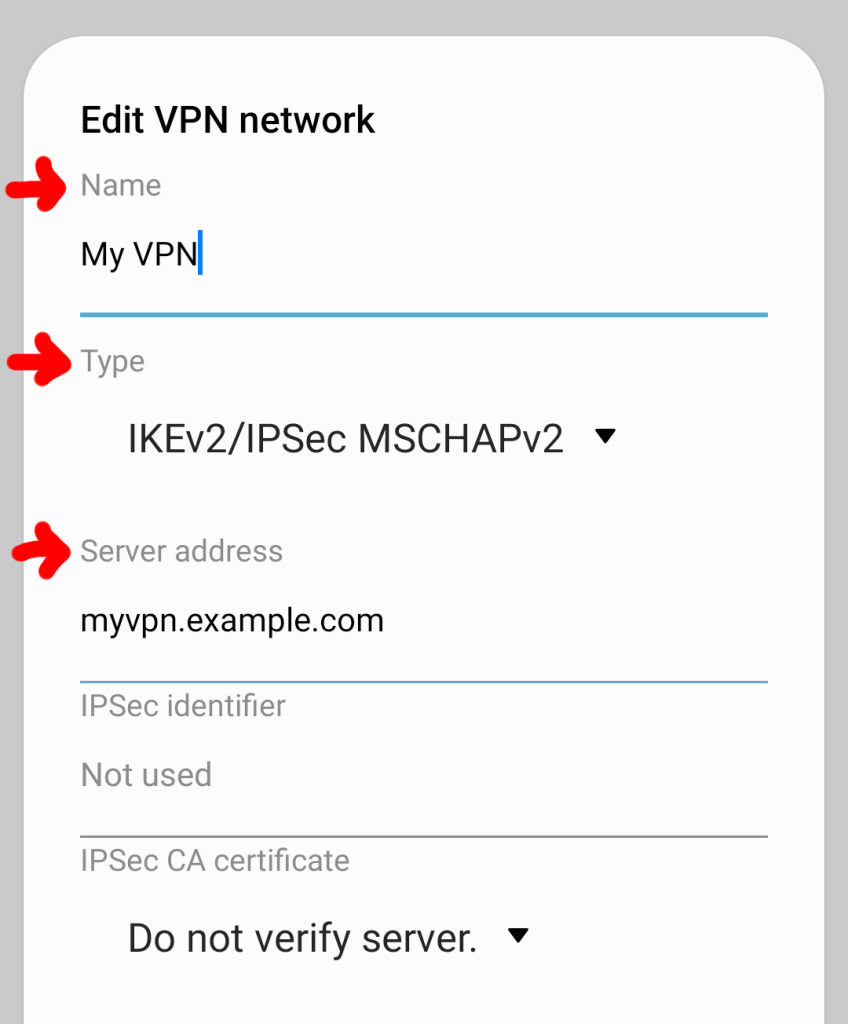
Step 7

A new options screen called “Edit VPN network” will appear.

Give your VPN a name. Next, select a protocol that is supported by your VPN, and enter the server address.

Scroll down and enter the username and password provided to you by your VPN service provider.

Tap “Save” and test it to be sure you’ve connected to the internet through the VPN. You can open your web browser and visit What Is My IP Address to verify that your IP address has changed.

All Done

Congrats! Your IP is now hidden on Android!

How to Hide Your IP Address in Chrome

Ever wonder how it’s possible to hide your IP address? Technically, it isn’t. In order to hide your real IP, you must replace it with a different IP address.

To do this, you need to use a VPN or proxy server. Either one assigns your device with a new IP so nobody can see your true IP address online. And that’s the basic idea behind achieving anonymity in Chrome.

Unlike browsers like Firefox which allow you to enter settings proxy settings natively, Chrome refers you directly to your OS network settings. Thus, you actually have to change the settings in your operating system.

Whether you use Windows or a Mac, this guide has you covered.

Step 1

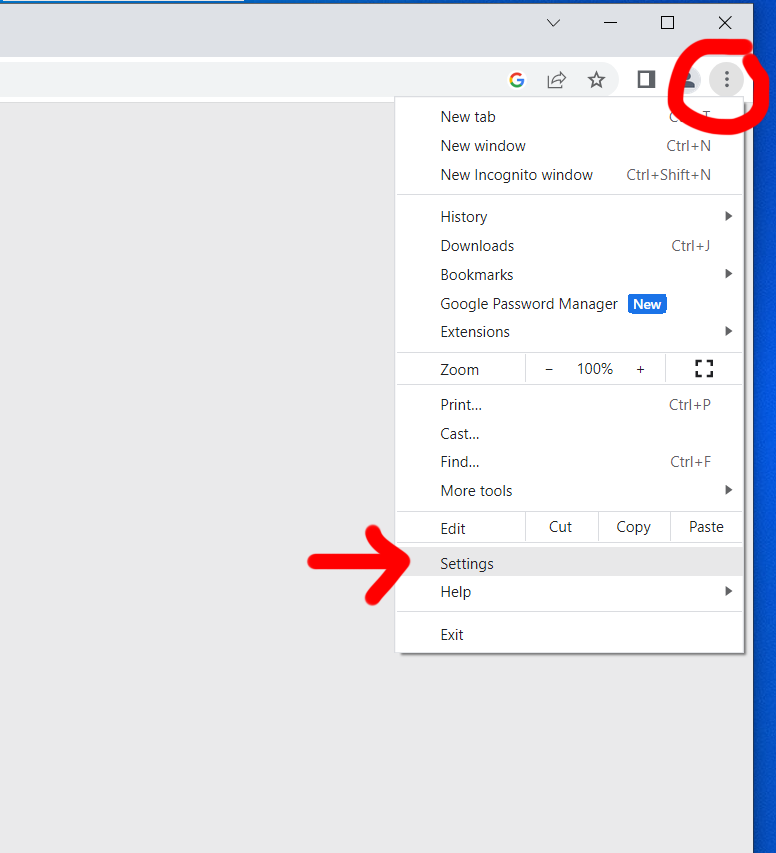
Locate the options icon to the far right of the Chrome browser window and click on it. The icon looks like three dots stacked on top of each other.

A pull-down menu will appear. Select “Settings” near the bottom.

Step 2

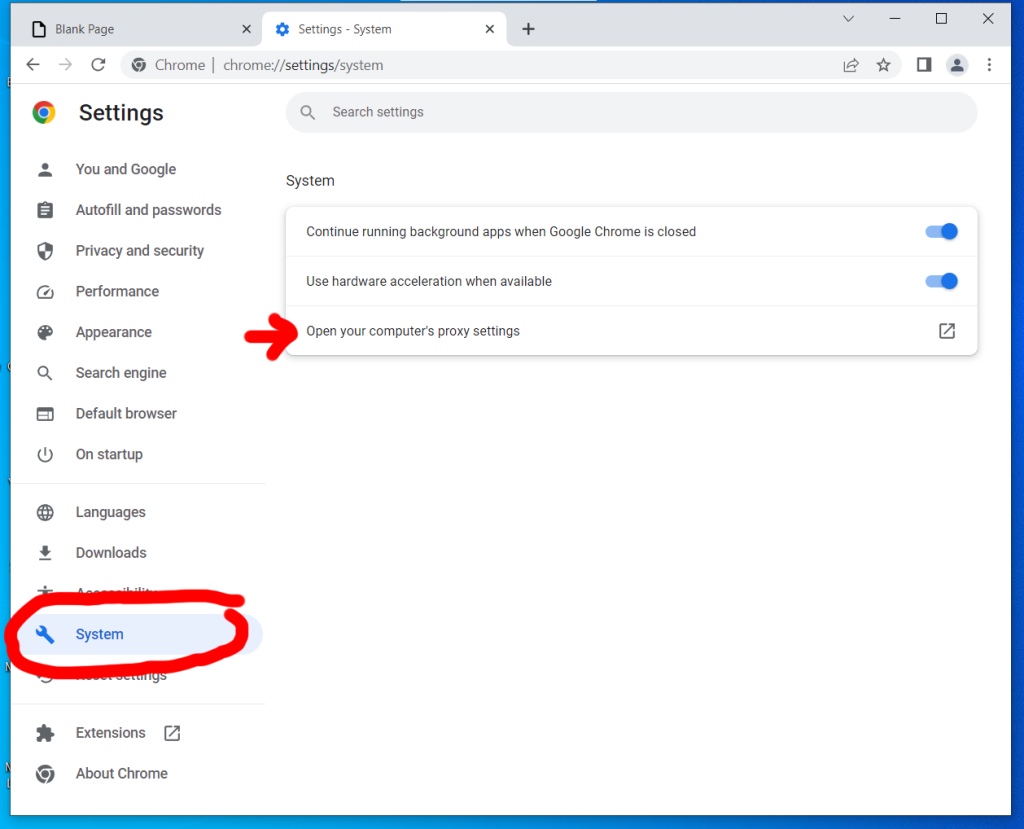
The settings page will appear directly in the browser window. On the left, you’ll see a tool icon with “System” next to it. Click it.

Step 3

Under the “System” settings you’ll see an option that says “Open your computer’s proxy settings.” Click it.

Step 4

In order to complete the next steps, you’ll need the info associated with your VPN or proxy server.

The VPN Route

VPN services provide you with a domain name or IP address, login, and password.

The Proxy Route

To use a proxy server, you need a domain or IP, and sometimes a login and password are required as well.

Which Should You Use?

Proxies and VPNs both hide your IP, but only a VPN will encrypt your data being sent and received from the internet.

If you’re looking for a VPN, check out LetMeBy’s reviews of the top VPN services. Or, scroll down to the list below for a quick peek. They’re all fast, inexpensive ($10/month or less), and highly recommended.

Recommended services:

Avoid free proxy services for anything other than testing. They’re almost always unusably slow. Plus, I wouldn’t trust my browsing data with most of the small operations offering it.

Step 5

Windows – Proxy

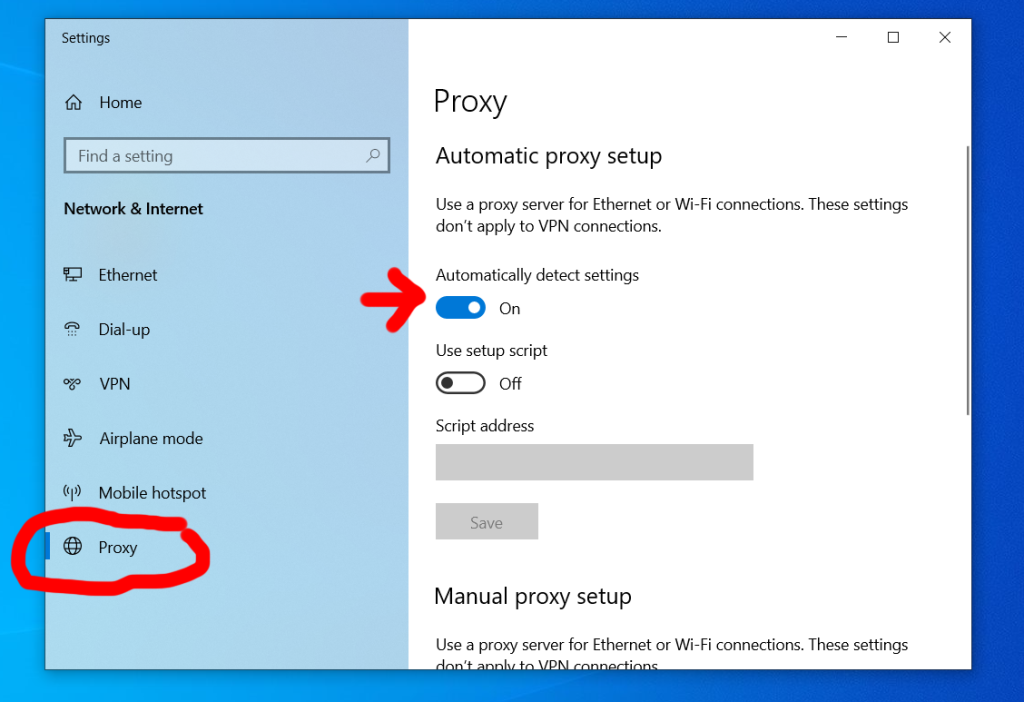
You’ll be directed to the “Proxy” menu under “Network & Internet” settings in Windows.

You can set up Windows to either detect your proxy settings automatically or you can enter your proxy manually.

To do it automatically, make sure “Automatically detect settings” is switched on. You’re good to go!

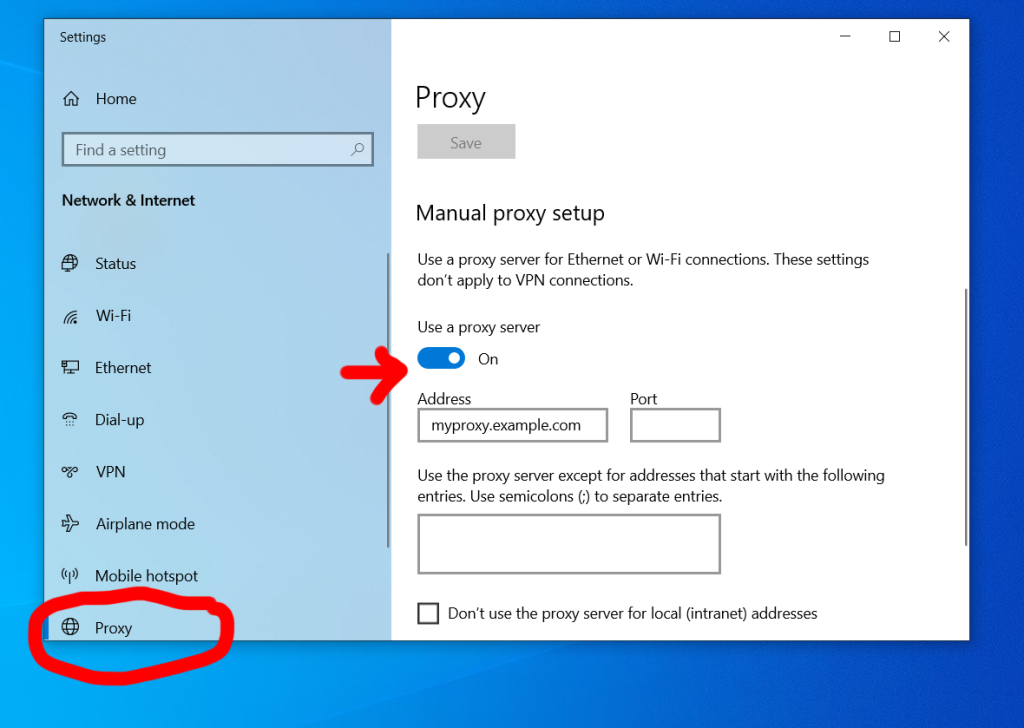
If you choose to do it manually, switch on “Use a proxy server” under “Manual proxy setup.” Enter your proxy server IP or domain name, plus the port number if required.

Note that Windows doesn’t support usernames and passwords for proxies out of the box. It requires you to create a two-step proxy in that circumstance which goes beyond the scope of this guide.

Windows – VPN

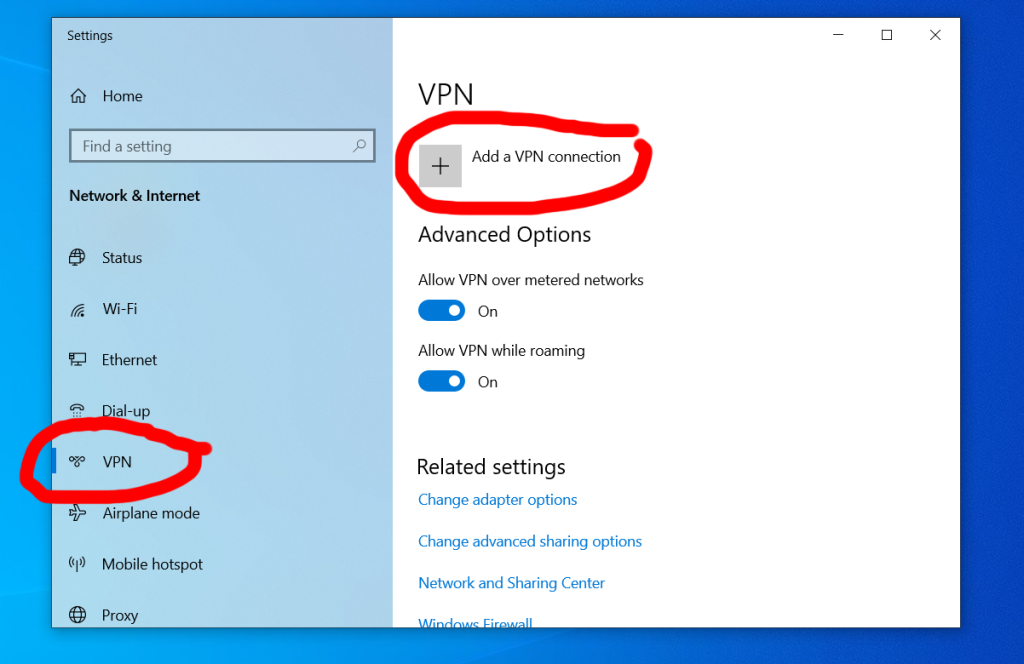
Click “VPN” at the left of the “Network & Internet” settings window.

Next, hit the plus (+) icon next to “Add a VPN connection.”

The VPN entry options will appear in the window. Enter the domain or IP, login, and password you were given by your VPN service provider.

Mac OS – Proxy

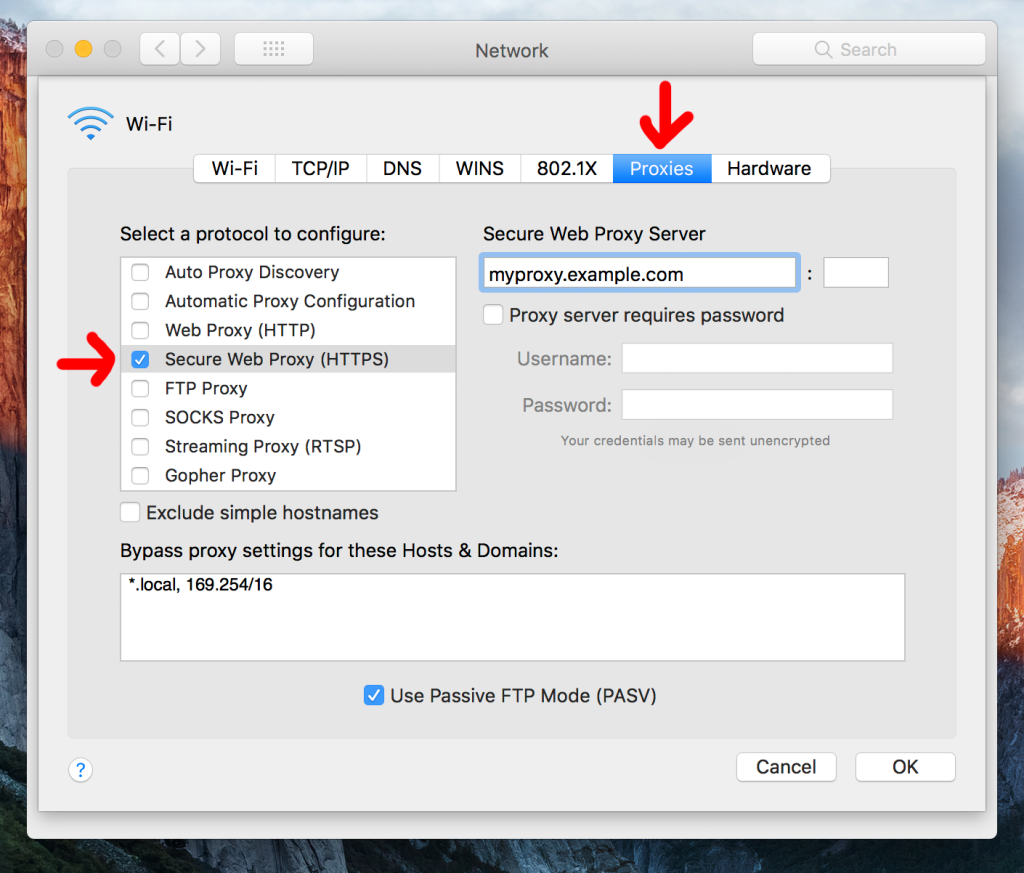
The “Network” window will appear with the “Proxies tab” selected. To use a proxy, check the box next to “Secure Web Proxy (HTTPS)” [preferable] or “Web Proxy (HTTP)” depending on the service.

Check the box next to “Proxy server requires password” and enter the login and password provided to you if it’s required.

Mac OS – VPN

Using a Mac with a VPN varies with different versions of Mac OS. Apple has done an excellent job of outlining the processes here.

Step 6

Congrats! You’re now ready to browse with your true IP hidden from prying eyes. Go back to Google Chrome and surf to your heart’s content.

How to Change Proxy Settings in Internet Explorer (IE)

At times your access to the internet could be restricted due to firewalls at school or work. Governments and ISPs can sometimes try to limit your freedoms as well.

It’s an annoying circumstance but totally avoidable with a little tech know-how. Whatever your reason for opting to use a proxy server, plugging an IP address into Internet Explorer is a straightforward process.

It’s important to note that Microsoft has retired IE. It’s essentially outdated software. And it could be tricky to get it to work with your proxy server or VPN.

With that understood, let’s get started with configuring it.

Changing your Proxy Settings in IE, Step-by-Step

Step 1

Double-click on the Internet Explorer icon on your desktop or launch the application from the Start menu in Windows.

Step 2

Click on the cog icon at the top right of the window. Near the bottom of the contextual menu, you’ll see “Internet Options.” Click it.

Don’t see a cog? If you’re using an old version of IE, try this: Select “Tools” from the menu at the top of the screen then click “Internet Options.”

Step 3

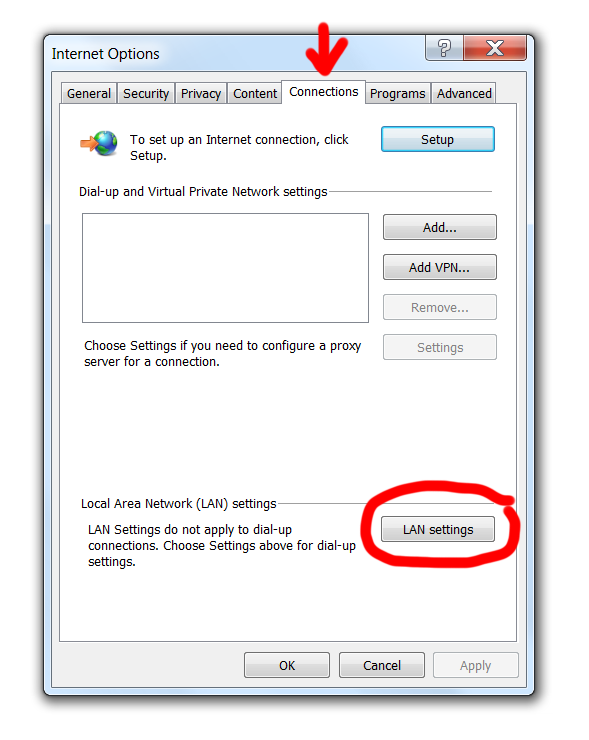
Choose the “Connections” tab at the top of the “Internet Options” window.

Now click on the “LAN settings” or “Settings” button at the bottom right.

Step 4

Auto-detect Route

If you have configured Windows to use a VPN or use VPN software, this is the easiest option… if it works.

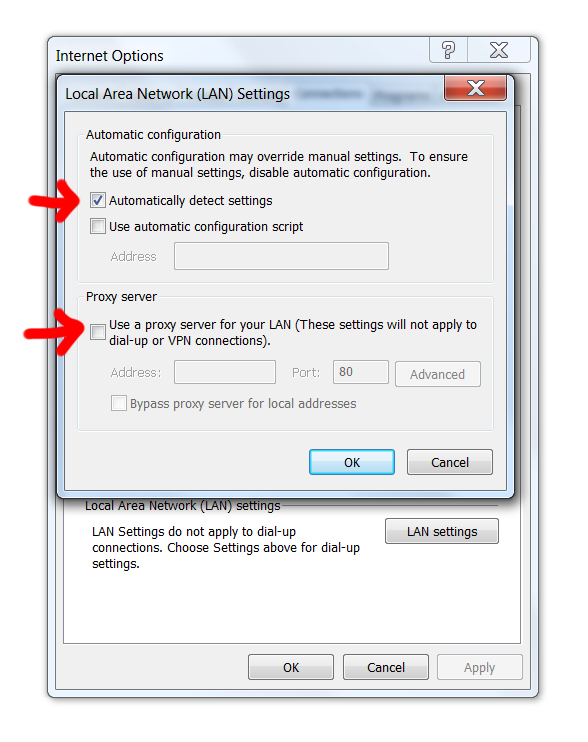
Check the box next to “Automatically detect settings” and see if it recognizes your system settings. If it does, you’re done!

Manual Route

To use a custom proxy, check the box next to “Use a proxy server for your LAN.” It’s under “Proxy server.”

This option will allow you the flexibility to add a port number, which in most cases is necessary when using a proxy from free lists.

Step 5

Copy and paste the server IP address in the text box next to “Address.” Now paste the Port number from the corresponding IP.

Step 6

Click on “OK.” Your proxy settings have now been modified. Load a web page to test if the proxy server is responsive.

Proxy Lists

A Few Tips for Newcomers

There are new sites showing up all the time that offer lists with free proxy servers. Unfortunately, many of the IP addresses are painfully slow or fail to work. Furthermore, easily-accessible lists have often been spoiled by spammers, so an IP address may not work because the site you are trying to view has banned the IP.

To save yourself the hassle of finding fresh, working proxies you may want to consider downloading Tor. It’s not a magic bullet either as the Tor network can be really slow at times. It works by creating a community in which users swap IPs. Setting it up on Internet Explorer is a hassle, while it’s super easy with Firefox so you may want to change your browser for tasks that require a proxy.

For the best speeds available, think about subscribing to a VPN service.

Goodbye to Internet Explorer Updates

Microsoft has stopped development for IE. And the company wants everyone to switch to Edge.

Since you’re reading this, you’re likely one of the people who doesn’t want to make the leap yet. After all, IE is a tried and true browser that many started their computing journey with. And it’s still preinstalled on many Windows machines.

For better performance when using a proxy server, it’s advisable that you use the final version: IE 11. Also, consider switching to a supported browser in the future as IE is no longer considered secure.

Note on Internet Explorer Versions

This tutorial was created for IE 11 users. If you’re using an older version and can’t find the proxy settings, consider upgrading your software.

Security Concerns

Never use a proxy server with a computer that doesn’t have virus protection. To be safe, download AVG Free or Trend Micro Internet Security and be sure to have the latest virus definitions.

How to Change Proxy Settings in Firefox

Is an ISP or institution blocking you from viewing online content? Yes, it’s frustrating. Thankfully you’re clever enough to know about proxies. The problem can be easily avoided by using a proxy server with your browser.

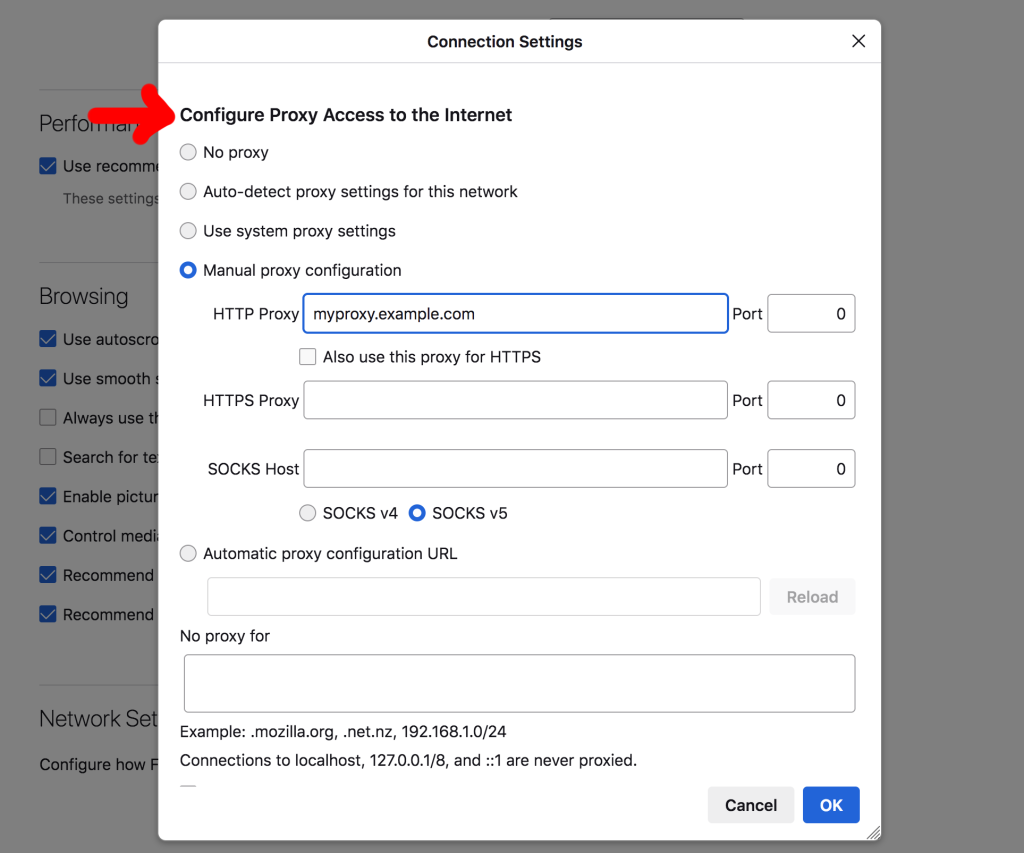
Firefox has basic proxy capabilities built right in. In the “Connection Settings” menu you can set up Firefox to auto-detect proxy settings used by your network, use system settings, or manually enter an IP address or domain name. Supported proxy server types include HTTP, HTTPS (SSL), and SOCKS (v4 or v5).

We’ll be looking at using both the automatic and manual options here.

Let’s get to the step-by-step instructions, shall we?

Step 1

Launch Firefox by double-clicking the Firefox icon on your desktop or by selecting it from the Start menu in Windows.

Step 2

At the top-right of the Firefox window, you’ll see a hamburger icon. It looks like three dashes stacked on top of each other. Click the hamburger icon and then select “Options” from the dropdown menu.

Step 3

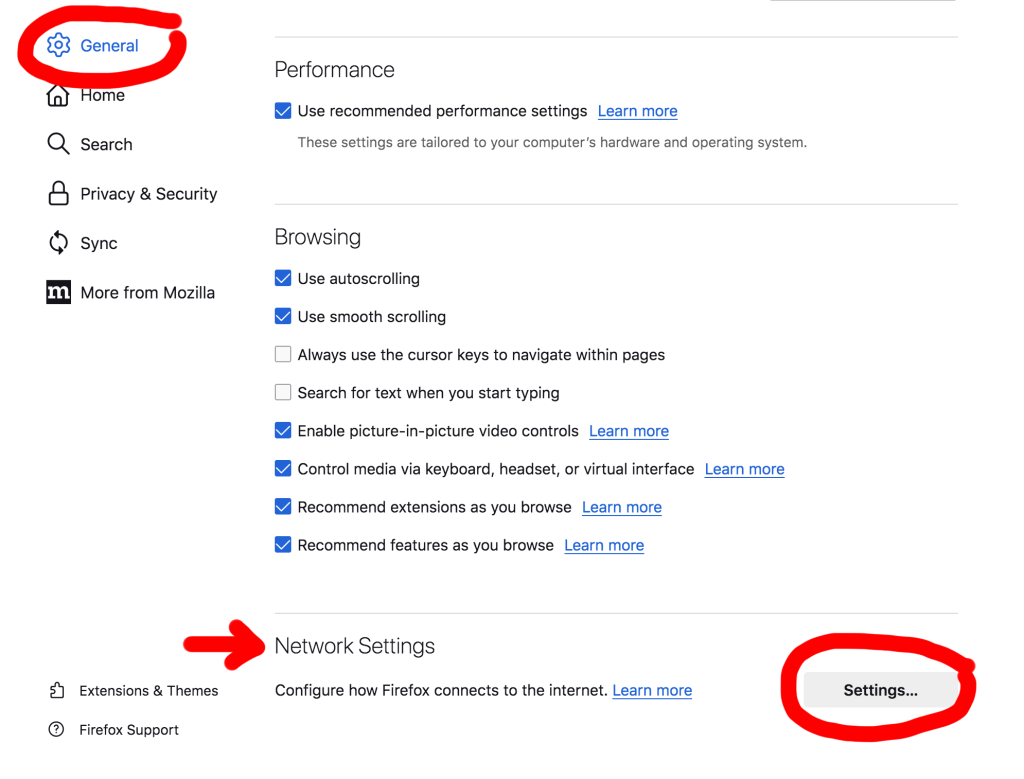
On the left, click on “General.” There’s a cog icon next to it.

Step 4

Scroll all the way to the bottom. Here you’ll see “Network Settings.” Click on the “Settings” button next to it.

Step 5

You’ve arrived at your destination. The “Connection Settings” window allows you to fully configure your proxy in Firefox.

Auto-detect Route

If you’re already using a proxy with your network or device you can auto-detect your proxy settings. Select the appropriate radio button and you’re done!

Manual Route

If you want to set up your proxy in Firefox only, click on the radio button next to “Manual proxy configuration.” The text boxes below will now become active, allowing you to enter a proxy server IP address or domain name.

Step 6

Copy and paste the server IP address or domain into the appropriate box. If you don’t know which type to choose start with HTTPS Proxy first as it’s commonly used and it’s secure.

Don’t assume you have selected the wrong type if it doesn’t work. Dead proxy servers are about as common as brown leaves on an autumn day.

Proxy Lists

Looking for free proxy servers to test? Try the lists on one of the sites below.

A Few Tips for Newcomers

There are slews of proxy sites popping up at the time. Annoyingly, many of the servers on free proxy lists are either painfully slow or don’t work. To make matters worse, public lists are abused by spammers, so these IP addresses could be already banned on the site you’re trying to view.

If you’re having trouble finding fresh proxies, consider using a Firefox add-on like FoxyProxy or Tor. Both automatically search for working proxies and offer more robust options than the native menus in Firefox. These solutions can also slow your browsing down to a crawl, so keep in mind that fast proxy servers aren’t free.

For best results, subscribe to a VPN service. Check out LetMeBy’s list of the top VPNs and choose from the best of the best.

Note on Firefox Versions

This guide is confirmed to work with Firefox 115.0. Mozilla typically doesn’t change the user interface substantially over time, so this method will likely be the ticket for a long while.

Security Concerns

Never use a proxy server with a machine that doesn’t have virus software installed. Protect yourself and your data by downloading something like AVG Free or Trend Micro Internet Security. Be sure to have the latest virus definitions as well.

How to Unblock Instagram at School or Work

Social media allows us to accomplish diverse tasks: from video chats with friends to spreading the word about your company’s services.

Use of apps like Instagram may be productive and relevant to what you’re doing at school or work, however many people scroll through content to slack off.

So, many institutions have opted to ban social media apps entirely, and network administrators are able to follow through on this by blocking access to URLs like https://www.instagram.com/.

Situations can arise where you need to check Instagram to do your work, but the network won’t allow it. And this is when bending the rules on occasion may be reasonable.

Can Insta be Productive?

Content on Instagram varies a lot and it has evolved considerably from a place to take in beautiful photos or post photos of your road trip. In fact, education, business and self-improvement are very popular topics on the platform.

Instagram can be enriching or a waste of time depending on your habits. It’s important to be mindful of the accounts you follow. While a lot of the photos on Instagram will merely be a distraction at school or work, some of it provides succinct knowledge that could actually save you time.

If used correctly, it can increase your productivity. However, few people have the discipline to pull this off.

The app has a great feature that allows you to limit the time on spend on it daily. To use it, go to “Settings”, then tap on “Account.” Next, tap “Your Activity” and you’ll see reminder and notification settings.

Unblock Instagram

Use Phone Data

If you launch Instagram and can’t view your feed, try turning off Wi-Fi and enabling wireless data.

There’s a good chance this will work because Wi-Fi uses the network which has internet access rules applied by the admin, while mobile data works independently of the local network.

Get a VPN

If you don’t have mobile data or don’t want to use up your monthly bandwidth, you can also use a Virtual Private Network (VPN) to access Instagram.

A VPN service allows you to choose a new IP that is associated with the location of your choice. This provided IP allows you to bypass restrictions set by the network admin while still connecting to the network via Wi-Fi.

It’s the best solution for people that want to hide their identity, location, or unblock apps and websites. You need to be subscribed to VPN service, many of which are fast and affordable.

To get started, learn more about the best VPNs that are recommended here most.

Use Your PC with Tor

If you simply want to browse Instagram and don’t need to post, using your PC is an alternative that is often overlooked.

If the URL https://www.instagram.com/ is blocked on all devices, you may be able to download and install Tor. This is proxy software that allows you to use the IP of another user connected to the Tor network.

Once the software changes your IP, Instagram will be unblocked. It’s free but be warned that it’s not as safe or nearly as fast as a VPN.

Typically, Tor should be a last resort, only to be used temporarily then uninstalled. This approach will only work at small businesses that don’t restrict which software can be installed.

Wrapping It Up

Use these tips responsibly and enjoy your new-found access to Instagram!

As the app can be useful at both school and work, blocking access might not be the best policy. However, it’s best to be as respectful of the restrictions even if you’re forced to bypass them at times.