Tag Archives: Google

How to Hide Your IP Address on Android

As VPNs have become widely used and smartphone processing power has exploded, Google has equipped Android with powerful VPN features.

Although there are apps that can hide your IP on Android, you can do the same thing right within the OS. Android has a built-in VPN client that supports many of the most popular VPN protocols.

This tutorial teaches you how to utilize a VPN service to mask your IP with no additional software.

Note that this guide was created using a Samsung smartphone. Your version of Android may look a bit different.

Step 1

Using a VPN has become the standard solution for anonymous browsing, making it next to impossible to trace activity back to your true IP address.

Before you get started with exploring the connection settings in Android, you need to have a VPN.

One of the first things to check is the VPN protocols supported by your version of Android. There’s a good chance it’ll be IKEv2/IPsec MSCHAPv2, IKEv2/IPsec PSK, and IKEv2/IPsec RSA. VPN technology is evolving quickly. Google moves to the fastest and most secure new protocols and leaves the rest behind.

Next, be sure that the VPN service you plan to use supports the same protocols as your version of Android.

I used a free VPN for testing purposes. And while free services can get the job done for light use, paid options are the fastest and offer superior security.

If you’re looking for a VPN, LetMeBy has reviewed the top 3 VPN services. Alternatively, if you’re in a hurry, here are the VPNs most commonly recommended on this blog:

Step 2

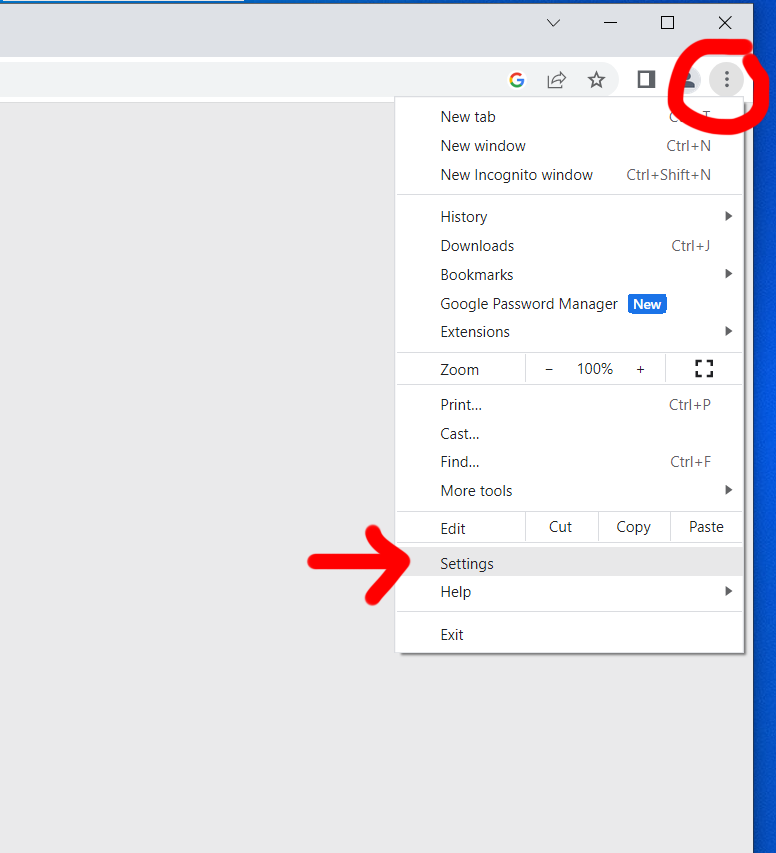
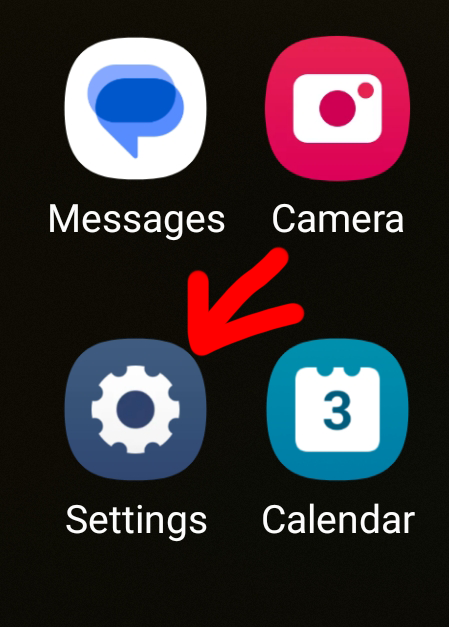
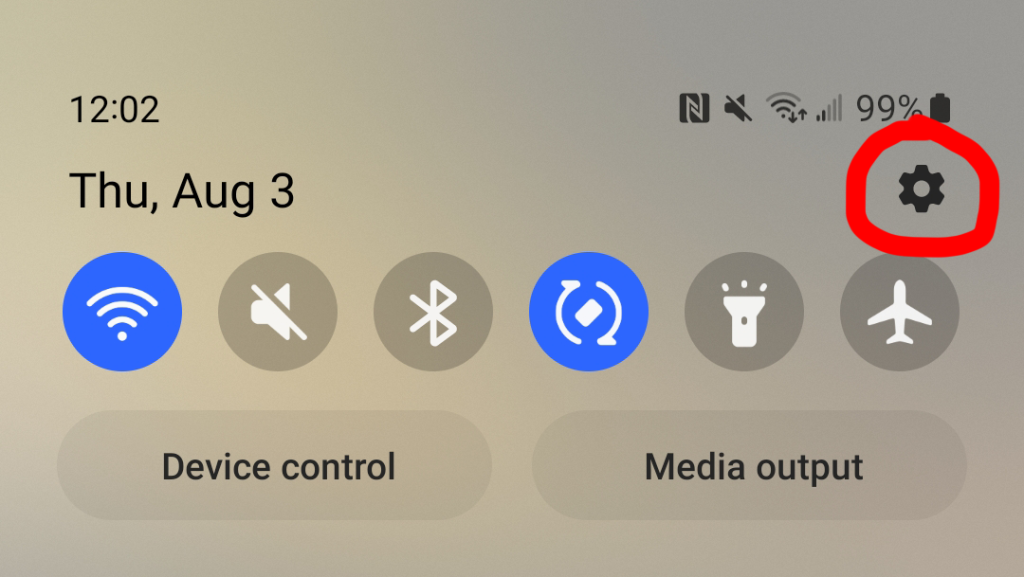
Locate “Settings” either by browsing your apps or by swiping down at the top of the screen to reveal the quick settings menu.

To access your settings from the quick settings menu, tap the cog icon at the top right of the screen.

Step 3

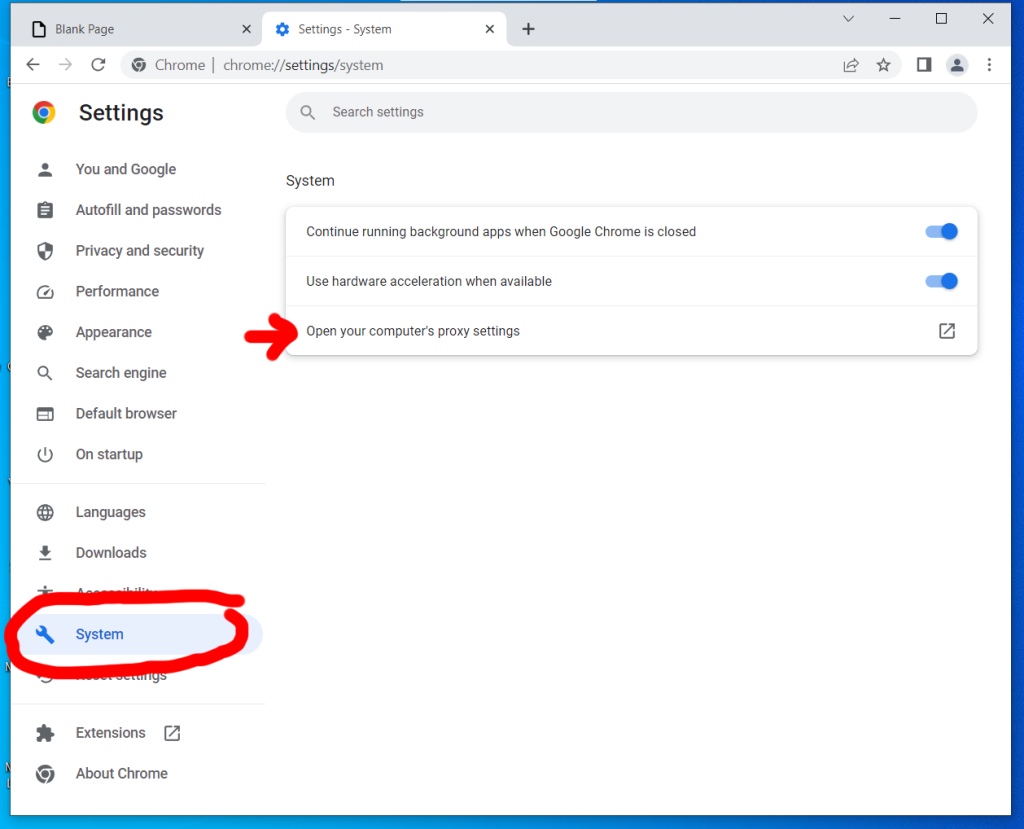
Now that the “Settings” menu has appeared, scroll down to “Connections” and tap it.

The options here control how you connect to the internet, connect to your mobile provider, Bluetooth devices, etc.

Step 4

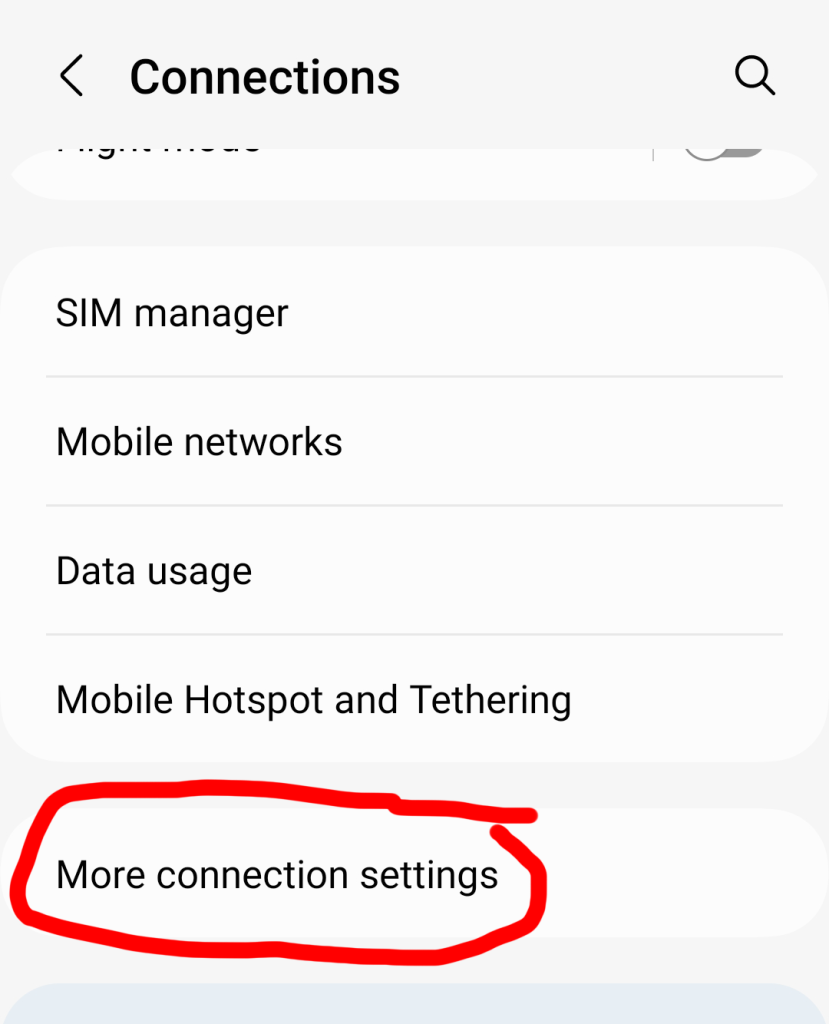
Scroll down to “More connections settings” near the bottom. Tap it.

Step 5

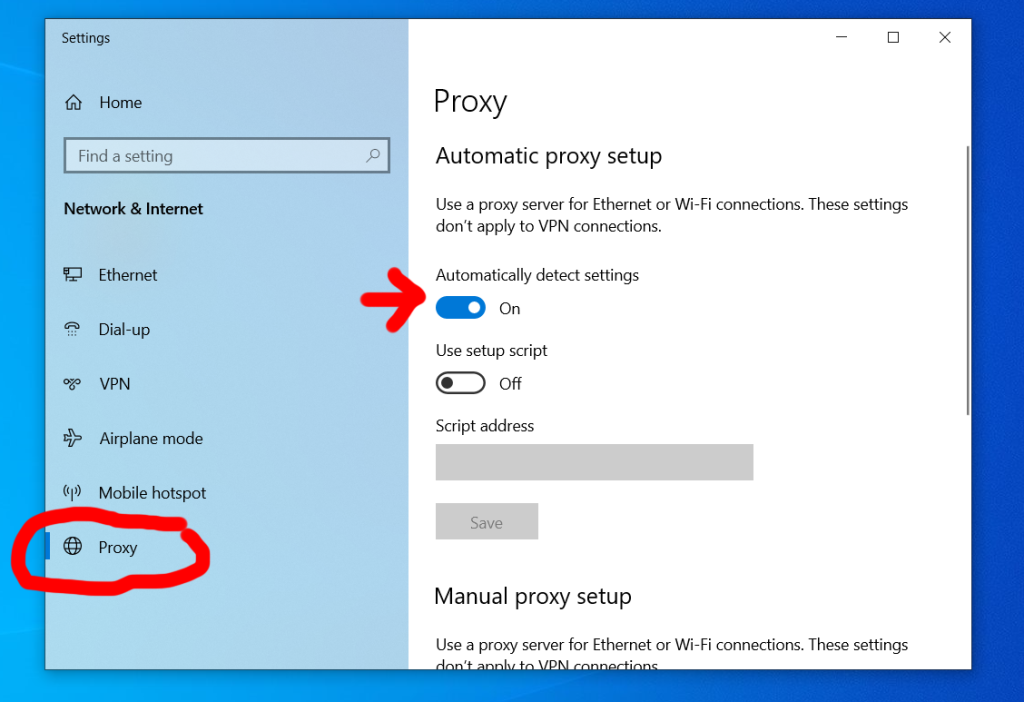
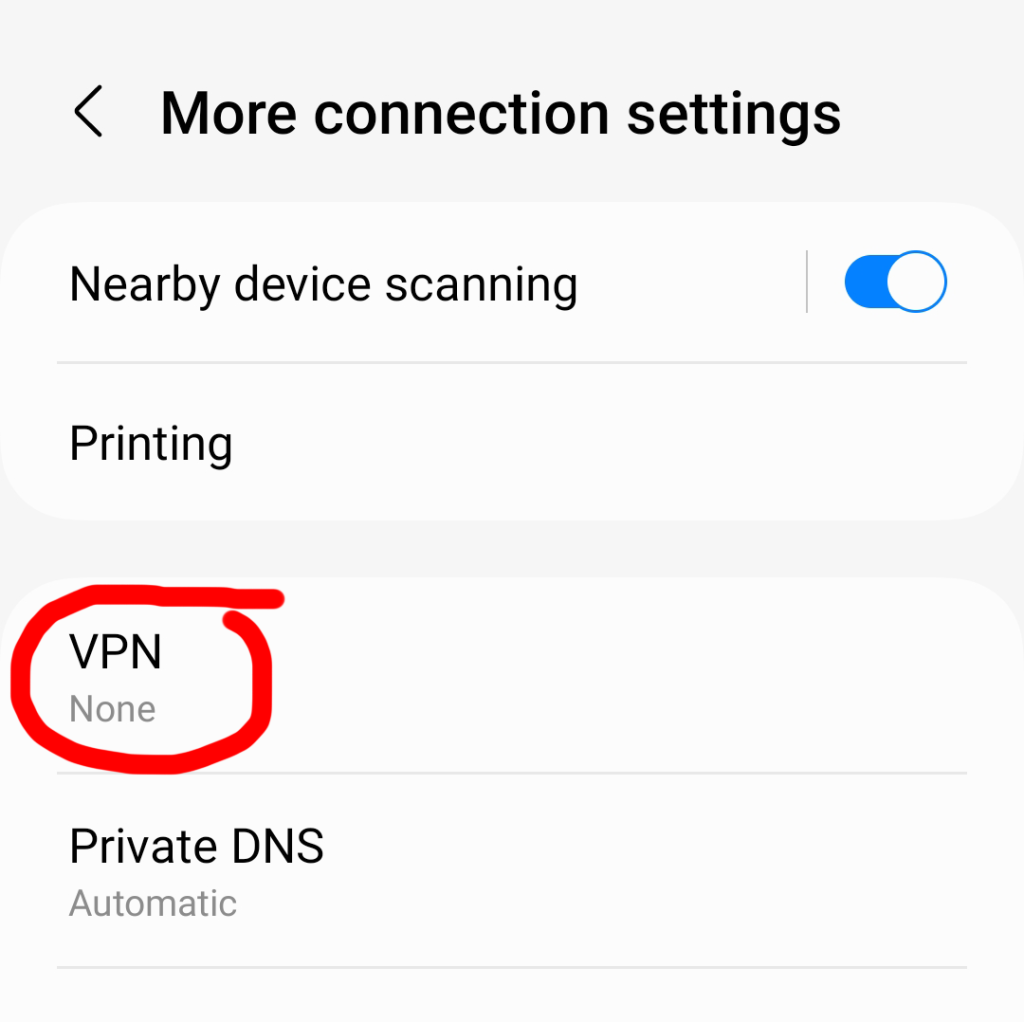
In the “More connections settings” screen, go to “VPN.”

Step 6

If you’ve never set up a VPN before this screen will be mostly blank with text that says “No VPNs.”

Tap the icon at the top right that looks like three dots stacked on top of each other. Choose “Add VPN profile.”

Step 7

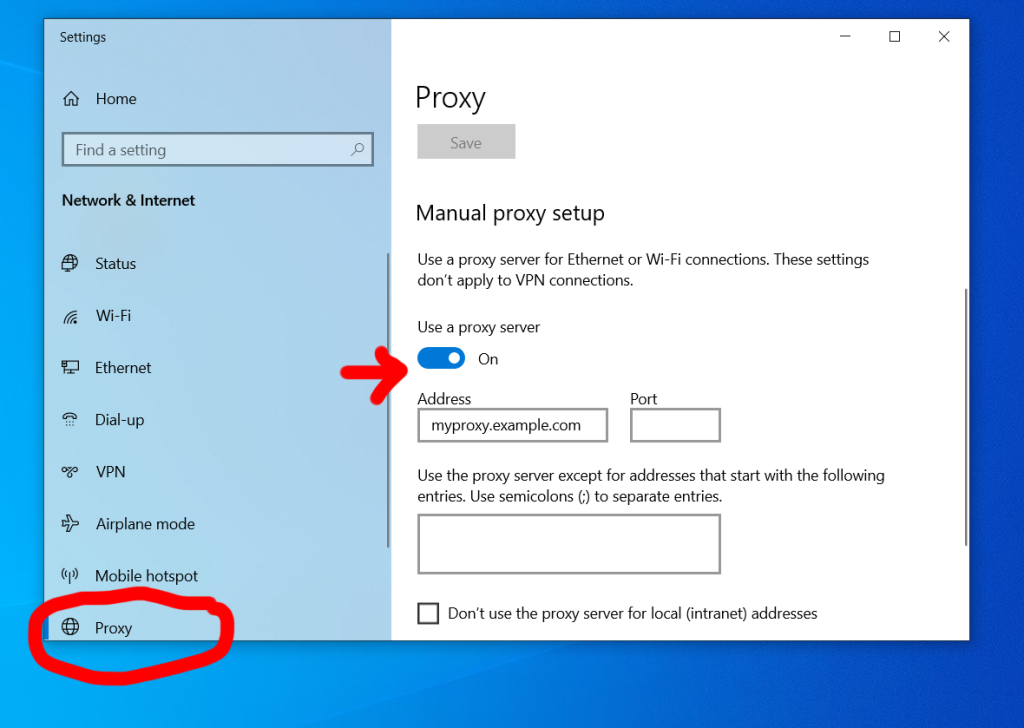
A new options screen called “Edit VPN network” will appear.

Give your VPN a name. Next, select a protocol that is supported by your VPN, and enter the server address.

Scroll down and enter the username and password provided to you by your VPN service provider.

Tap “Save” and test it to be sure you’ve connected to the internet through the VPN. You can open your web browser and visit What Is My IP Address to verify that your IP address has changed.

All Done

Congrats! Your IP is now hidden on Android!

How to Hide Your IP Address in Chrome

Ever wonder how it’s possible to hide your IP address? Technically, it isn’t. In order to hide your real IP, you must replace it with a different IP address.

To do this, you need to use a VPN or proxy server. Either one assigns your device with a new IP so nobody can see your true IP address online. And that’s the basic idea behind achieving anonymity in Chrome.

Unlike browsers like Firefox which allow you to enter settings proxy settings natively, Chrome refers you directly to your OS network settings. Thus, you actually have to change the settings in your operating system.

Whether you use Windows or a Mac, this guide has you covered.

Step 1

Locate the options icon to the far right of the Chrome browser window and click on it. The icon looks like three dots stacked on top of each other.

A pull-down menu will appear. Select “Settings” near the bottom.

Step 2

The settings page will appear directly in the browser window. On the left, you’ll see a tool icon with “System” next to it. Click it.

Step 3

Under the “System” settings you’ll see an option that says “Open your computer’s proxy settings.” Click it.

Step 4

In order to complete the next steps, you’ll need the info associated with your VPN or proxy server.

The VPN Route

VPN services provide you with a domain name or IP address, login, and password.

The Proxy Route

To use a proxy server, you need a domain or IP, and sometimes a login and password are required as well.

Which Should You Use?

Proxies and VPNs both hide your IP, but only a VPN will encrypt your data being sent and received from the internet.

If you’re looking for a VPN, check out LetMeBy’s reviews of the top VPN services. Or, scroll down to the list below for a quick peek. They’re all fast, inexpensive ($10/month or less), and highly recommended.

Recommended services:

Avoid free proxy services for anything other than testing. They’re almost always unusably slow. Plus, I wouldn’t trust my browsing data with most of the small operations offering it.

Step 5

Windows – Proxy

You’ll be directed to the “Proxy” menu under “Network & Internet” settings in Windows.

You can set up Windows to either detect your proxy settings automatically or you can enter your proxy manually.

To do it automatically, make sure “Automatically detect settings” is switched on. You’re good to go!

If you choose to do it manually, switch on “Use a proxy server” under “Manual proxy setup.” Enter your proxy server IP or domain name, plus the port number if required.

Note that Windows doesn’t support usernames and passwords for proxies out of the box. It requires you to create a two-step proxy in that circumstance which goes beyond the scope of this guide.

Windows – VPN

Click “VPN” at the left of the “Network & Internet” settings window.

Next, hit the plus (+) icon next to “Add a VPN connection.”

The VPN entry options will appear in the window. Enter the domain or IP, login, and password you were given by your VPN service provider.

Mac OS – Proxy

The “Network” window will appear with the “Proxies tab” selected. To use a proxy, check the box next to “Secure Web Proxy (HTTPS)” [preferable] or “Web Proxy (HTTP)” depending on the service.

Check the box next to “Proxy server requires password” and enter the login and password provided to you if it’s required.

Mac OS – VPN

Using a Mac with a VPN varies with different versions of Mac OS. Apple has done an excellent job of outlining the processes here.

Step 6

Congrats! You’re now ready to browse with your true IP hidden from prying eyes. Go back to Google Chrome and surf to your heart’s content.

Clever Hacks to Get YouTube TV in Canada

YouTube TV launched in the U.S. in 2017. There’s been speculation that they would expand outside of the U.S. and offer their streaming service to Canadians along with others like Hulu. However, YouTube TV hasn’t made an official announcement about this.

So, Canadians that are tired of hoping and waiting may want to grab the bull by the horns. Yes, you can get access to YouTube TV in Canada today! All you need to do is jump through some hoops before signing up and follow the tech savvy steps in this guide.

Is It Worth the Effort?

Netflix, Amazon Prime Video and CBS All Access are available in Canada. Thus, one might wonder if getting YouTube TV in Canada is really worth it.

For those who want a comprehensive replacement for cable TV, it is. This a great opportunity to get sports, news, and special interest programming you don’t have access to on Netflix.

Channels on YouTube TV

Google has obtained deals with the five major TV networks in the U.S.: ABC, CBS, Fox, NBC, and The CW. About 40 cable channels owned by the parent companies of those networks are all onboard. This includes content from The Walt Disney Company, CBS Corporation, NBCUniversal, Brave, USA Network, Discovery, CNN, Cartoon Network, Fox Sports 1, BBC, ESPN and more.

Like traditional cable TV, it’s also possible to add additional premium channels. Some of these channels include AMC Premiere, Showtime, and NBA League Pass.

How to Gain Access to YouTube TV in Canada

YouTube TV has a variety of methods to verify if the user is based in the U.S. Therefore, to pass these checks and successfully get a YouTube TV account, you need to ensure their site can’t tell you’re based in Canada.

1. VPN Location Magic

First, you’ll need a VPN. By using a VPN, you can access the web with an IP address associated with a physical location in the U.S.

To do that, sign up with a VPN provider, and choose a plan. These services are very inexpensive these days. And typically, if you’re willing to commit to a plan for a year or more, you can save quite a bit.

Recommended VPNs are listed below. For more details, read full reviews of the top 3 VPN services here.

2. Get a U.S. PayPal Account

If you use a Canadian credit card, you’re rolling the dice. You may be able to rig YouTube TV’s payment system to accept it, but that doesn’t work with every credit card provider.

The most reliable method is to set up a U.S. PayPal account.

To ensure success, be sure to follow these tips:

  1. Before you do anything, enable your VPN. And make sure the service has assigned you with a U.S. IP address. This will give you access to the U.S. version of PayPal.
  2. Use a valid email that isn’t already associated with a PayPal account.
  3. When signing up, put in your real street address and credit card info, as you normally would.
  4. You’ll need to choose a zip code and find the U.S. city that is associated with it. The full process is below.

Your Canadian postal code needs to converted to a zip code. To do this, remove all the letters from it. For example, a postal code of M4B 1G7 is changed to 417. Next, to make it valid, add zeros to the end so it’s five digits. So, your new zip code should look something like this: 41700.

Keep in mind the zip code you got from the above process must be real for it to work. To verify if it’s valid, go to the USPS website and enter it. If it’s invalid, replace one of the zeros with a one. That should do the trick.

Finally, enter the U.S. city from the address found in the USPS link, along with your real street address. Now you should be able to complete the PayPal sign-up process.

3. Create a U.S. Gmail Account

This part is really simple!

  • Go to Gmail.com and click on the option to get a new account.
  • Make sure that you select the United States as your location.
  • Validate your account with your mobile phone number.

4. Change Your Location in Chrome

Although you’re now using a VPN to hide your location, Chrome can still spill the beans and reveal that you’re actually based on Canada.

The final step in hiding your whereabouts is editing the settings in Chrome’s location services.

Important: you’ll need to repeat these steps every time you launch your browser

  • Launch Google Chrome
  • Press ‘Ctrl,’ ‘Shift,’ ‘I’ to open Chrome’s backend framework on a PC. Mac users will want to hit ‘Command,’ ‘Option’ and ‘I.”
  • Click the icon made up of three little dots in the top corner of the new panel that just launched. Go to ‘More Tools,’ and then select ‘Sensors.’
  • You’ll now see an option called ‘Geolocation’ with a dropdown menu next to it. Select a location in the U.S. such as ‘San Francisco’ or ‘Mountain View.’
  • Great, now Chrome will think that you’re in the U.S.

5. Access Your YouTube TV Account

Whew, you’re nearly there. All you need to do is test that everything worked.

  • Go to the YouTube TV website.
  • Sign in with your U.S. Gmail account.
  • Choose to pay for the service with PayPal, then sign in the PayPal account you just created.
  • If all is good you should see a $1 charge and refund in your PayPal account (this is part of the validation process).

You Did It!

Congrats! You now have YouTube TV, just like the fortunate folks in the States.

As the process is pretty involved this guide is intended for PC and Mac users.

If you’re even more ambitious and tech savvy you can also get YouTube TV to work on Google Cast, Android, iOS, and Apple TV. To learn more about support for these platforms check out the guide on MobileSyrup (and scroll to the bottom of the article).

Best Chrome Extensions that Protect Your Privacy

From ad and tracker blocking, HTTPS, advanced proxy to interfacing with the Tor network, the right extensions can turn Chrome into a dream machine.

It’s time to stop passively allowing corporations, shifty sites and shady third parties to feast on any private data they can manage to grab. Now that you’re on to them, arm yourself with some of the following top privacy-enhancing extensions for your browser.

AdBlock

Browsing history, cookies and other various data is exploited aggressively by Advertisers. So that gas barbeque you showed a fleeting interest in will definitely be showing up again in cube ads – haunting you for days. Changing your privacy settings on the most common offender’s sites makes a difference, but who has the time?

Adblockers are the most popular extensions out there and AdBlock continues to be the dominant force in this arena. Big boys in tech have devised methods to force their ads to display even when AdBlock is enabled. However, it’s still a great way to generally declutter your Web experience.

Ghostery

Almost every major site out there uses cookies and tracking technology, and it builds a profile of you based on your activity. Worse, there are suspicious third parties with malicious agendas far worse then just attempting to sell you the latest widget.

Ghostery finds every instance of trackers embedded on the sites you visit. It then gives you the ability to tailor how you handle these trackers depending on the level of trust you have for the site in question.

HTTPS Everywhere

Major sites have made the switch to beefed-up HTTPS security but many smaller operations haven’t caught up. This means ISPs can easily access your browsing on these sites if laws allow in your country.

Big names in anonymity software EFF and the Tor Project have joined forces to give web users a secure experience on every site. Insecure HTTP sites are automatically converted to secure HTTPS thus preventing surveillance, account hijacking, as well as some varieties of censorship.

Proxy SwitchyOmega

SwitchyOmega provides an alternative to digging though the advanced setting section in Chrome, and the chore of filling and clearing proxies in the config dialog of your OS. This is a powerful, timesaving idea for power users, because just one proxy server will often not get you very far, especially the free variety. Enter all your proxy servers IPs, plus port, protocol, then switch between them quickly with a mere click.

Kronymous

Formerly called KroTor, this extension allows you to access the Tor network. It’s a more advanced alternative to the easy-to-use Tor Browser that requires no configuration and works out of the box. Tinkerers will love the extensive options Kronymous provides, plus the ability to continue using your preferred browser, Chrome.

Cupcake

Cupcake aims to make Tor “the onion router” tastier by giving it a pathway into your web browser. A plain, happy or sad cupcake is displayed depending on the status of the proxy, signifying not in use, in use, or disabled respectively. Chrome users that don’t need the extensive options found in Kronymous may prefer this.

Open in Tor Browser

Sometimes the simplest solutions are the best, not to mention the least likely to break. Open in Tor Browser is perfect for Chrome users that occasionally want to switch to true incognito mode with Tor Browser when viewing sensitive content. The only catch is you’ll need to install a minimal native client for it to open links correctly in Tor Browser.

Graphic: Sean MacEntee